Four Elms Bookkeeping logo Four Elms Bookkeeping logo

FOUR ELMS BOOKKEEPING

Mudford, Yeovil, Somerset
telephone icon 01935 850807


WHAT HAPPENED TO THE DATE-TIME PICKER IN SOME RECENT RELEASES OF MICROSOFT EXCEL?

Backward compatibility with earlier versions of Excel is essential if macro-enabled workbooks created in earlier releases of Excel are to continue working in Excel 2016 or later. But are Visual Basic for Applications UserForms and code written in Excel 2010, Excel 2007 or Excel 2003 guaranteed to work in Excel 2016 or Excel 2013?  Not always, it seems!

Most code written for the Microsoft Operating System relies on dynamic link libraries produced by Microsoft.  The Visual Basic code is like the top layer of a stack which calls up and executes DLL or OCX files resident in the Windows operating system.  Remove even one element of the supporting framework and the top level code ceases to function. This can cause compatibility issues when Visual Basic for Applications (VBA) modules are imported into later versions of Excel than the one in which they were originally written: dynamic link libraries or files needed by the VBA code are sometimes retired from the Excel DLL support framework causing the VBA modules to stop working.

After upgrading to Microsoft Office 2016 in February 2017 one of the first things I noticed is that many VBA Userforms which I had created for the input of accounting data no longer worked. The error messages from the Visual Basic compiler were a bit cryptic: the offending forms were declared not to exist despite the fact that they were displayed correctly on the screen in the IDE form designer. A line by line debug of the form revealed that this perplexing message was triggered by one particular Active-X control: the date-time picker. What the compiler actually meant was: "the date-time pickers on the form cannot be created" but the closest it could get was to declare the form non-existent. Compiler error messages are not always straightforward or easy to understand!

image of date-time picker control 
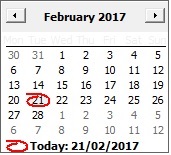
Figure 1: Date Time Picker

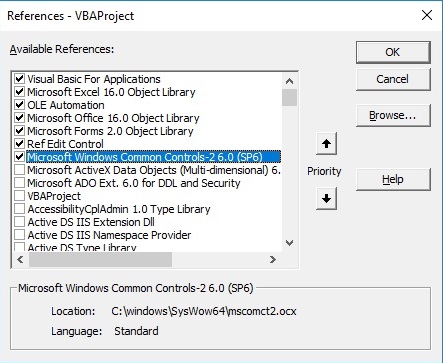
The date-time picker is a very useful control on forms. Not only does it facilitate the input of dates by users, but its calendar interface overcomes the common confusion between US-style and UK-style date formats when dates are input textually as a combination of numerals and backslashes. On the left is a picture of this control in action automatically highlighting the default date on which I used this control. It allows the user to move easily one month or a whole year backwards or forwards from the current date. Dates can be entered quickly and accurately: no-one used to this well-designed Active-X control would like to revert to entering dates via the keyboard as text. This made it disappointing that Microsoft had apparently removed this Active-X calendar tool, but not replaced it by any equivalent date picker widget. When I first installed Office 2016 on Windows 10 Professional, Excel 2016 was therefore missing an indispensable Active-X control which it enjoyed in the past. Later I did discover this ActiveX control on a different Windows 10 Office 2016 install, so maybe Microsoft are now continuing to provide this useful tool after all. But what can one do if, like me, one finds this useful date picker is no longer available within the Excel 2016 Developer IDE?

The file which creates the date-time picker is called   mscomct2.ocx  and used to live in the   C:\Windows\SysWOW64\ directory. If you are about to upgrade from Excel 2003, 2007 or 2010 to Excel 2013 or later then you may wish to keep a copy of this file so that you can continue to use it after your upgrade. Unfortunately this file is no longer available for download from Microsoft and only unofficial sites still offer this file for download. The process of making this control available in a later version of Office is not entirely straightforward and precautions are advisable to safeguard your Windows registry and operating system in case you make a mistake.

The date-time picker is an old VB6 control with a long service life stretching back to the days before .NET (Visual Basic 6 was released in 1998 but has now been retired.). As such it is a 32 bit legacy executable. When Microsoft moved to 64 bit operating systems it divided the dynamic link (DLL and OCX) files between two system folders. DLL files intended for 64-bit architecture were placed in the   C:\Windows\System32\   folder whereas legacy 32-bit DLL or Active-X files got the  C:\Windows\SysWOW64\   folder. (The names of the folders can be confusing: the 32-bit DLLs go in the folder with 64 in its name while the 64-bit DLLs go in the other one with 32 in the name.) Putting a DLL in the correct folder is important. If we place our   mscomct2.ocx   Active-X control in the SysWOW64 folder the Windows operating system will know that it is a 32-bit executable and make the necessary adaptations to run a 32-bit executable within a 64-bit operating system.

To get a legacy date-time picker working in Excel 2016 we need to do the following:

  1. Obtain, copy from an old machine or download a copy of mscomtl2.ocx to the desktop or downloads folder of the machine running Excel 2016.
  2. Running the machine as administrator, copy mscomtl2.ocx to the C:\Windows\SysWOW64\ folder.
  3. Register the newly imported mscomtl2.ocx executable with the Windows Registry. In case you make a mistake, you are strongly advised to make a backup of your Windows Registry before carrying out this step.  This step also requires administrator access to the computer.

Before carrying out any manual changes to the Windows Registry it may be worth taking a backup of the Registry. The Windows Registry is a database containing tens of thousands of configuration settings relating to the users, software and security of your machine. Without it your computer could not function. The registry is in continual use by your machine: even when your computer appears to be quiet and no applications are running your machine can be performing thousands of registry lookups and alterations each second. It is quite possible to make changes to your registry which render your machine unusable, prevent it booting up and even make it necessary to reinstall your Windows operating system from scratch. For this reason it may be a good idea to ensure that the the registry can be restored to its current state before you manually alter any settings, just in case you make a mistake or the unexpected happens. There are two ways you can backup your registry. Firstly you can access the registry editor on your machine by typing "regedit" in the start search menu (Cortana) and then selecting the Regedit run command. When the registry editor loads you can make a backup by using the File>Export menu option (see Figure 2).  If anything goes wrong you can reimport the registry by using the File>Import menu option.

A second method of backing up the registry is to use the System Restore facility, though sometimes I have found it does not work as expected - registry backups are more straightforward. The restore option is slightly more thorough than the registry backup since it also backs up some system files in addition to the registry. Also when your computer is restored to an earlier state any software installations which took place since the restore point was created are reversed out. The Windows operating system automatically generates restore points in response to certain events like installing new software which does not employ a standard Microsoft installer, or when unsigned DLL files are loaded onto your machine. However you can also manually generate your own restore points by using the system restore utility located in the control panel. Type "restore" in the control panel search and you will find the wizard to create your own restore point shown in Figure 3.

Once you have created your registry backup or restore point (assuming you have decided to proceed with caution!) you are ready to install and register the date time picker Active-X file.

Screenshot of registry editor 
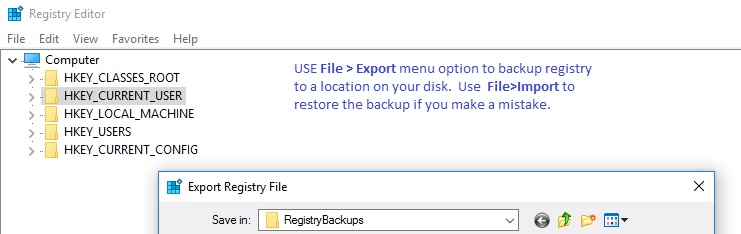
Figure 2: Windows Registry import and export

Screenshot of restore point wizard 
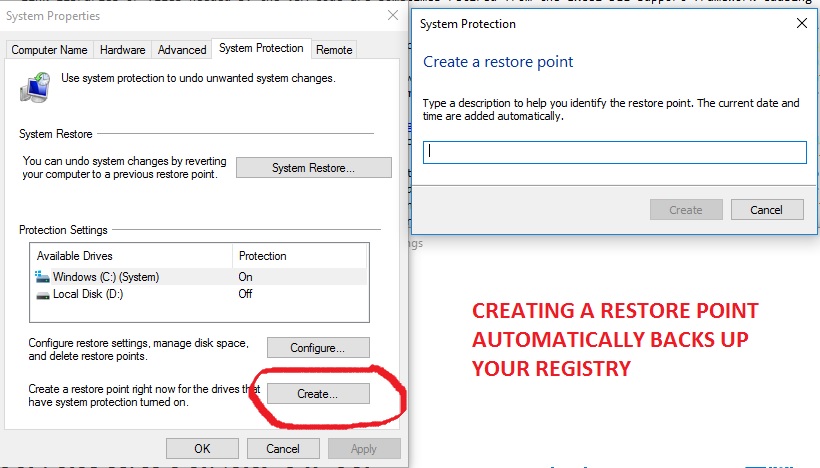
Figure 3: Creating a restore point
Screenshot of Command Window Run as Administrator 
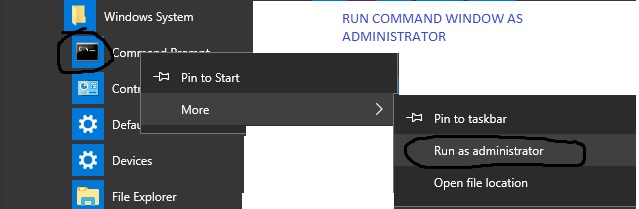
Figure 4: Running Command Window as Administrator

Installing and registering the mscomct2.ocx date time picker Active-X control 
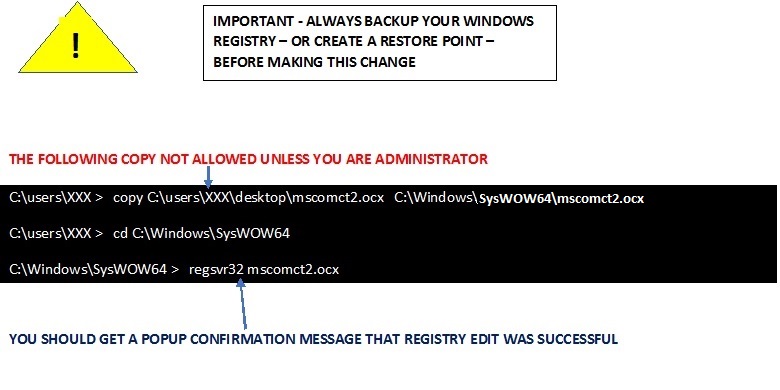
Figure 5: Copying and Registering mscomct2.ocx

Visual Basic IDE references showing mscomct2.ocx highlighted and registered

Figure 6: The Tools>References menu in the Visual Basic IDE showing the newly registered date time picker

To copy files from your desktop or downloads folder to the systems folders, including C:\Windows\SysWOW64\ you need to exercise administrator privileges on your computer. We can copy our file to the directory for 32-bit DLL executables by using either the MS-DOS Command Window or by using Powershell. Whichever you choose you must select the option to run the utility as administrator (see Figure 4).

Once the utilities are launched you need to copy the file from wherever you temporarily stored it (probably your downloads folder or your desktop) to the C:\Windows\SysWOW64\ folder. The MS-DOS commands you enter are the same for the Command Window and Powershell. (Powershell is a more recent tool which does rather more than the old Command Window, but it still understands the old MS-DOS language.)

The following MS-DOS commands is for a user with administrative privileges whose username is "XXX". Remember to replace the "XXX" with your username on the computer.

To copy the files from your desktop or other directory to another directory you use the syntax
Copy [source path + filename] [destination path + filename]
So if your username is XXX and the file was downloaded to your default Downloads folder you would type:
Copy   C:\users\XXX\downloads\mscomct2.ocx    C:\Windows\SysWOW64\mscomct2.ocx
The example shown in Figure 5 is for a copy from the user's desktop.

The final two MS-DOS commands shown in Figure 5 are firstly to change directory to the SysWOW64 folder (to make the last MS-DOS command simpler) and then to actually register the file in the Windows registry. To change the working directory type the command shown in the second line in Figure 5 which uses the syntax
cd  [new directory]
Finally to register the file use the command shown in the third and final line in Figure 5 which uses the syntax:
regsvr32 [filename]
If the last command successfully registers the Active-X control then you will get a popup confirmation message and you can be confident that the required registry changes have been made. If you want to search your registry you will find that this newly saved file appears in several registry keys within the ROOT hive (HKCR).

Figure 6 shows References checklist in the Visual Basic editor of Excel 2016 after a successful registration of the date time picker. It is described as under Microsoft Windows Common Controls-2 6.0 (SP6) but the location filename at the bottom confirms that this is our newly imported control. VBA userforms which include date time pickers should now work again as in earlier versions of Excel and you can even add the date time picker to collection of widgets in your Userform toolbox so that you can quickly generate new instances of it. You may find that you are asked to confirm that you are happy for ActiveX controls to be enabled each time you open any workbook which uses the date-time picker.

Hopefully nothing went amiss in the registration process. If it did then you can restore the registry from the backup (if you made one), or restore your computer to its pre-registration state (if you created a restore point) and try again.

PLEASE NOTE: The information in this article is provided in good faith and describes a technique successfully used by the author on a machine running 64-bit Windows 10 Professional operating system and Excel 2016. The same technique also enabled user forms containing date-time pickers to be created in Excel 2007 running on Windows Vista. However Four Elms Bookkeeping accepts no liability for any malfunctioning of your computers that may result from readers attempting to follow the instructions or advice in this article

Return to Home Page

Excel Macro Development